HOME

How to hand solder SMD parts

If you want work with LEDs as I do you also have to be able to solder LEDs and tiny little SMD ICs as well as other tiny SMD parts onto a PC board. Especially the SMD parts are not really easy to solder and I myself hesitated almost half a year before I first tryed it even though I already had some skills in handsoldering conventional pc boards.

These SMD parts could be soldered onto protoboards which have presoldered holes and copper pads. Some of these protoboards also are double sided. I myself prefer edging my own boards as it is easier to solder on them than on a protoboard. And the boards look nicer and have the size and shape I need for a certain modifakation.

To solder SMD parts you don't really need an expensive special equipment although this would be a great help. All what I use is:
  • a twenty years old Weller soldering station (TCP Magnastat)
  • fine pointed soldering tip
  • tweezers with pointed tips
  • a 'helping hand' with a 5x magnifying glass (see picture below)
  • liquid solder flux
  • 0.5mm solder wire (whithout flux!)
  • solder wick (to remove solder)
  • a old tooth brush for cleaning
  • alcohol for cleaning
  • two halogen lamps for a good illumination

If you ever have seen those tiny SMD parts you will understand that it's almost impossible to solder them without the help of a magnifiyng glass although I have seen with my own eyes people doing this. They must have eyes like an eagle! As I didn't want to invest much money for my equipment I bought a 'helping hand' as shown here:

      
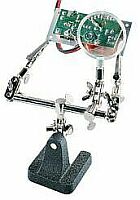
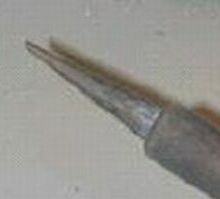
my 'helping hand' and a fine pointed soldering tip

This 'helping hand' costs only about CHF15.- (~$10). Usually I have the small boards resting on the table and don't use the clips. Some people I know use a headset with an magnifying optic on it.

Ok, and how to solder these tiny parts to the board? Below you will find how I do solder SMD parts. This is for sure not the only and probably also not the best way to do it. But it works for me. Others do have their own method. A couple of months ago I found a website describing how to solder pc boards in a toast oven and the author says this works great! I also have read from another guy which has used his wifes iron (the one used to iron clothes). If you want to try these two methods it would be best first asking your wife for permission or wait until she has left the house ...

But now here is how I do solder SMD parts:
  • Clean the etched board with alcohol using the brush
  • I then always first presolder the copper pads of my fresh etched boards as it's then easier to solder the SMD parts. But apply only a very little amount of solder - the copper pads should be coated with only a very very thin layer of solder. If you have applied to much solder remove it with the solder wick. The pads should be absolutly even!
  • Apply again some flux onto the copper pads.
  • Put the first SMD part on the right place on your board. You certainly will understand that for this you now need the tweezers and the magnifying glass. Hold the SMD component with the tip of the tweezers to the board so it doesn't shift while soldering. Tip: Before soldering I first apply again some flux to the pads and to the pins of the SMD component.
  • Take only a little bit - and I really mean a very very little bit - of solder on the iron tip. The more solder you're applying the more shortcuts you eventually will have!
  • Then first solder only one side/one pin of the component to the board. Don't care if its more a kind of glueing than soldering. The idea behind this is only to fix the part to the board so it doesn't move! Especially when soldering ICs you now have the opportunity to exactly (and carefully) align the other pins to the pads.
  • Now solder the other side/the other pins. Always apply enough flux to the pads and the pins but again use only a very very little bit of solder! These soldering joints now should be good ones but don't get upset if you notice some bridges between the pins. You later can remove them with solder wick. Important: Take care you don't touch the the pins and pads too long with the tip of the soldering iron. Not only the ICs don't like too much heat but also the copper pads will peel away from the epoxy board!! Using enough flux helps you to get a perfect soldering joint in a split second because the melted solder is running much smoother along the pins and copper pads than without flux.
  • Eventually solder the side/pin you first have only 'glued'.
  • Check all soldering joints carefully with the magnifying glass! For this I use a 10x magnifier. If you have applied too much solder you must remove it with solder wick. Tip: If you hold the pc board towards a light source you will see the solder bridges/shortcuts better as the light shines through the epoxy board. Next tip: If you again apply some flux before using the solder wick the desoldering also goes much easier! If you see bad soldering joints (the ones where the solder didn't really flow along the pins and pads) you must solder them again.
  • If everything is ok, clean the board again with alcohol and the tooth brush to remove all remaining flux and let the board dry a couple of minutes before you start to test the circuit!
The most important things I've learned:
Always use much flux (I think you can't use too much of it) and always use as little solder as possible!

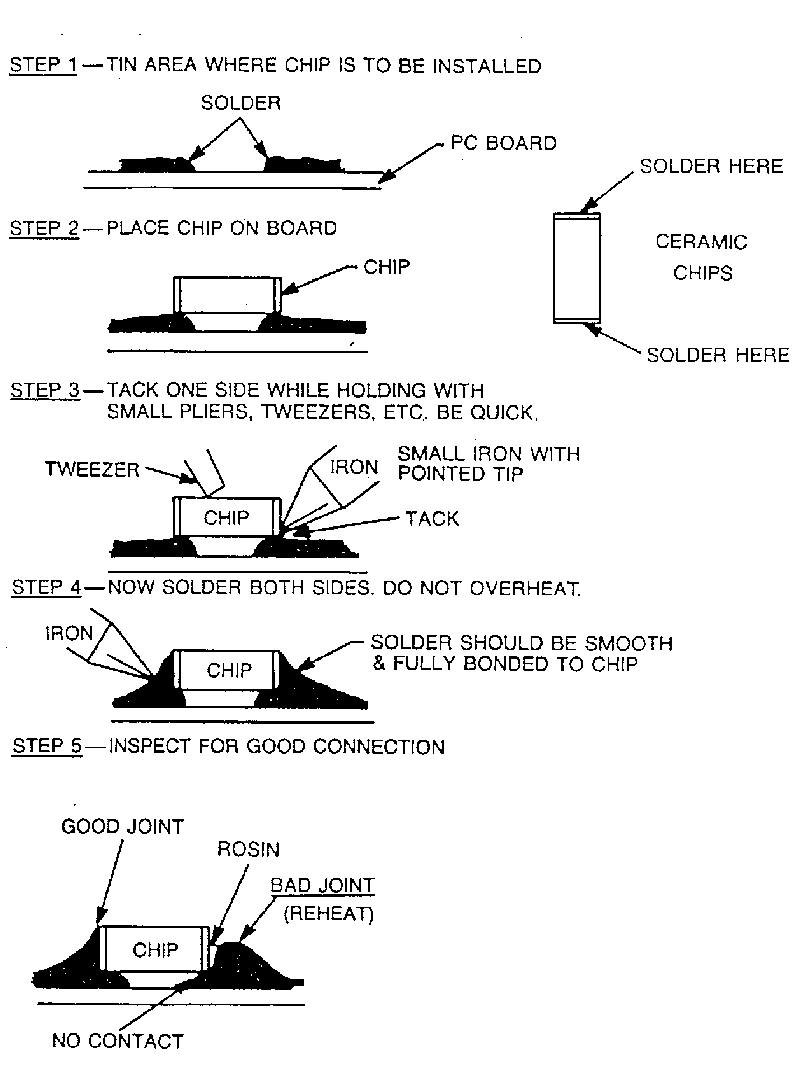
The picture below (it's not from me, I found it somewhere in the internet but have forgotten where) shows exactly how to solder such SMD parts. The only thing which in my opinion isn't good: There is to much solder on the copper pads before putting the SMD component on the board!

And my very last tips for beginners:
Don't first try to solder a more or less expensive IC. Buy some cheap 0805 or better 1210 sized SMD resistors and start with soldering these parts to your board! Be aware that you also will damage one or two of your boards because you touch the copper pads too long. And your first IC should not be a 8uMAX or even worse a 10uMAX chip. Start with an IC in a SOT23 housing with only 3 or 5 pins as these ones are much easier to solder!

And now: Good luck!